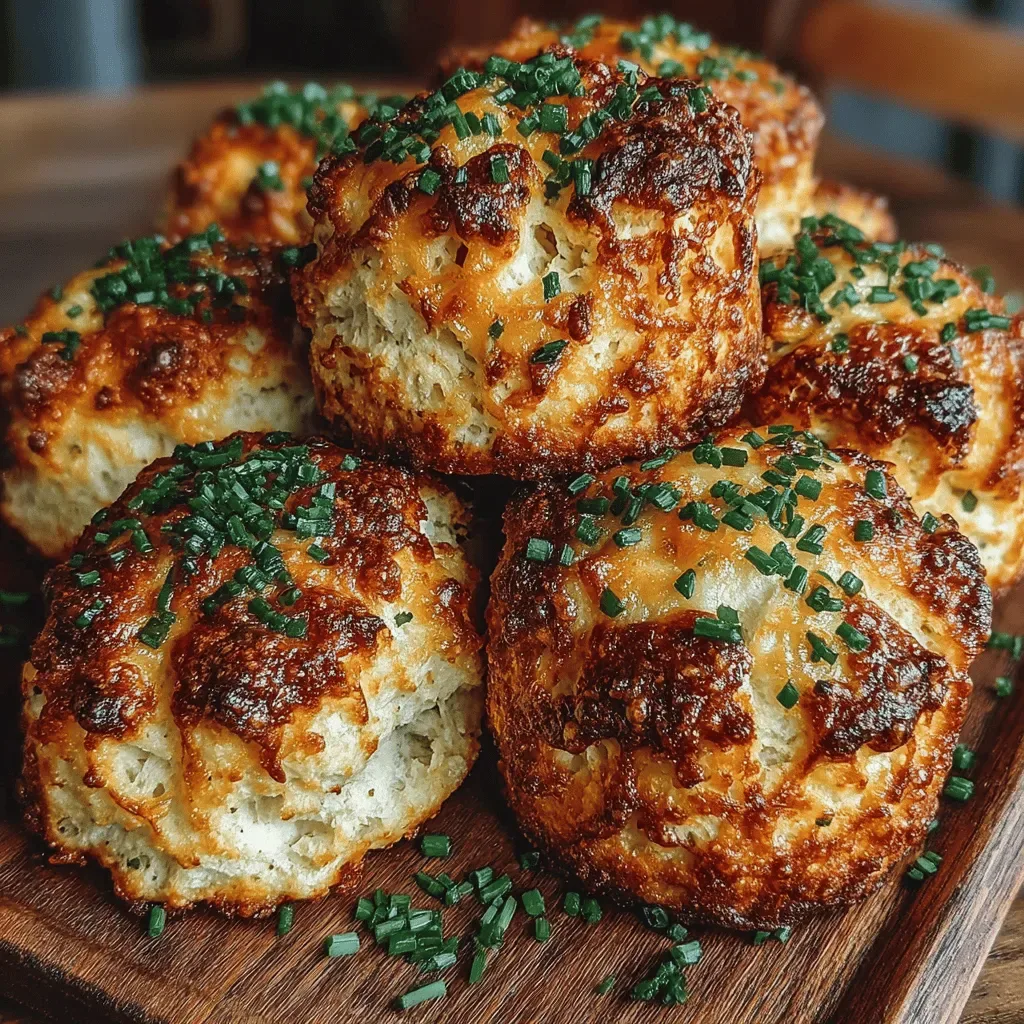
Imagine pulling a warm, golden‑brown scone from the oven, the aroma of melted cheddar and caramelized onions filling your kitchen. That first bite—crusty on the outside, tender and cheesy on the inside—sets the tone for a perfect brunch.
What makes these scones truly special is the marriage of sharp cheddar with sweet, slowly sautéed onions, all lifted by a light, buttery dough that rises just enough to stay fluffy without becoming bread‑like.
Busy parents, weekend brunch hosts, and anyone who loves a comforting handheld breakfast will adore this recipe. Serve them alongside fresh fruit, a drizzle of honey, or a dollop of sour cream for a complete experience.
The process is straightforward: whisk dry ingredients, fold in the cheese and onions, gently combine with cold butter and buttermilk, shape, and bake until beautifully risen. In under an hour you’ll have a batch of scones that look as impressive as they taste.
Why You'll Love This Recipe
Bold Cheddar Flavor: Sharp, aged cheddar melts into the dough, delivering a rich, tangy bite that keeps you reaching for more with every crumb.
Onion Sweetness: Slow‑cooked onions develop a natural sweetness that balances the cheese’s sharpness, creating a harmonious flavor profile.
Quick & Easy: With minimal mixing and a single bake, these scones fit perfectly into a busy morning schedule without sacrificing taste.
Versatile Serving: Perfect on their own, with jam, or as a savory base for eggs and avocado—these scones adapt to any brunch spread.
Ingredients
The foundation of a great scone is a balance of dry and wet components, plus the star ingredients that give it character. Flour provides structure, while cold butter creates flaky layers. Buttermilk adds tenderness and a subtle tang, and the cheddar delivers that unmistakable savory depth. Caramelized onions bring a gentle sweetness that rounds out the flavor, making each bite both comforting and sophisticated.
Dry Ingredients
- 2 cups (250 g) all‑purpose flour
- 1 tablespoon baking powder
- ½ teaspoon kosher salt
Cheese & Dairy
- 1 ½ cups (170 g) shredded sharp cheddar cheese
- ¼ cup (55 g) cold unsalted butter, cubed
- ¾ cup (180 ml) cold buttermilk
Onion Mixture
- 1 large yellow onion, thinly sliced
- 1 tablespoon olive oil
- ¼ teaspoon granulated sugar (optional)
Seasonings & Finishing
- ½ teaspoon freshly cracked black pepper
- 1 tablespoon melted butter, for brushing
Together these ingredients create a perfect balance of texture and flavor. The cold butter and buttermilk keep the crumb tender, while the cheddar melts into every pocket. Caramelized onions add a subtle sweetness that offsets the cheese’s bite, and a light dusting of black pepper adds just enough heat to keep the palate excited.
Step-by-Step Instructions

Caramelizing the Onions
Heat a skillet over medium heat, add 1 tablespoon olive oil, and then the sliced onion. Sprinkle the optional sugar to encourage caramelization. Cook, stirring occasionally, for 12‑15 minutes until the onions turn deep golden and fragrant. This slow process develops natural sugars that give the scones a sweet‑savory depth.
Preparing the Dry Mix
In a large bowl whisk together 2 cups flour, 1 tablespoon baking powder, and ½ teaspoon salt. This ensures an even rise and prevents pockets of leavening.
Incorporating Butter and Cheese
- Cut in the butter. Add the cubed cold butter to the dry mix. Using a pastry cutter or fingertips, rub the butter into the flour until the mixture resembles coarse crumbs with pea‑size pieces. Cold butter creates steam pockets during baking, yielding a flaky texture.
- Fold in cheddar. Sprinkle the shredded cheddar over the crumb mixture and gently toss to distribute evenly. The cheese should be evenly speckled throughout the dough for consistent flavor in every bite.
Adding Wet Ingredients & Forming the Dough
- Combine buttermilk. Make a well in the center of the dry ingredients and pour in ¾ cup cold buttermilk. Stir gently with a wooden spoon until just combined; the dough will be slightly sticky. Over‑mixing develops gluten, which can make scones tough.
- Integrate onions. Fold the caramelized onions (including any pan juices) into the dough, then season with ½ teaspoon black pepper. The juices add moisture and flavor, so handle the dough lightly.
Shaping and Baking
Turn the dough onto a lightly floured surface, pat it into a 1‑inch thick circle. Using a sharp 2‑inch round cutter, cut out scones, gathering scraps and re‑rolling as needed to maximize yield (you should get about 8). Place scones on a parchment‑lined baking sheet, brush tops with 1 tablespoon melted butter, and bake in a preheated 400°F (200°C) oven for 18‑22 minutes, or until golden and a toothpick inserted comes out clean. The butter brush adds a glossy finish and extra richness.
Tips & Tricks
Perfecting the Recipe
Cold Ingredients Matter: Keep butter and buttermilk chilled until the moment you mix them. Cold fat creates steam, which translates into flaky layers.
Handle Dough Lightly: Over‑working the dough develops gluten, making scones dense. Mix just until ingredients are combined.
Even Thickness: Pat the dough to a uniform 1‑inch thickness for consistent baking and rise.
Pre‑heat the Oven: A hot oven creates an immediate rise, giving the scones a beautiful dome.
Flavor Enhancements
Add a pinch of smoked paprika to the dry mix for subtle smokiness, or fold in a tablespoon of chopped chives for fresh herb notes. A drizzle of honey on warm scones elevates the sweet‑savory balance without overpowering the cheddar.
Common Mistakes to Avoid
Don’t let the butter melt before cutting it into the flour; melted butter makes the dough gummy. Also, avoid baking at a lower temperature—this can result in flat, dry scones instead of a puffed, golden top.
Pro Tips
Use a Lightly Floured Bench Knife: This tool cuts through the dough cleanly, preserving its airy structure.
Brush with Garlic‑Infused Butter: Melt butter with a tiny clove of minced garlic; brush on top for an aromatic finish.
Cool on a Wire Rack: Transfer baked scones to a rack to prevent steam from making the bottoms soggy.
Freeze for Later: After cooling, wrap individual scones in parchment and freeze; reheat in a 350°F oven for 8‑10 minutes.
Variations
Ingredient Swaps
Swap sharp cheddar for Gruyère or smoked mozzarella for a different flavor profile. Replace the yellow onion with caramelized shallots for a milder sweetness, or add cooked bacon bits for a smoky, meaty twist. For a herbaceous version, incorporate ¼ cup finely chopped fresh thyme or rosemary into the dough.
Dietary Adjustments
Use a gluten‑free flour blend (ensure it contains xanthan gum) in place of all‑purpose flour for a celiac‑friendly scone. Substitute dairy‑free butter and a plant‑based buttermilk (almond milk + lemon juice) for a vegan version, and choose a sharp dairy‑free cheese alternative.
Serving Suggestions
Pair the scones with a dollop of herbed Greek yogurt, a spoonful of fig jam, or a light arugula salad tossed in lemon vinaigrette. For a brunch spread, serve alongside poached eggs and smoked salmon for an elegant touch.
Storage Info
Leftover Storage
Allow scones to cool completely, then place them in an airtight container or a zip‑top bag. Store in the refrigerator for up to 4 days. For longer keeping, freeze in a single layer on a baking sheet, then transfer to a freezer bag; they’ll retain quality for up to 3 months.
Reheating Instructions
Reheat refrigerated scones in a 350°F (175°C) oven for 8‑10 minutes, or until warmed through and the tops regain a slight crisp. For frozen scones, bake directly from the freezer at 375°F for 12‑15 minutes. A quick microwave works in a pinch—heat 30 seconds, then finish under a broiler for a few seconds to restore the crust.
Frequently Asked Questions
This Cheesy Delight scone blends sharp cheddar, sweet caramelized onions, and a buttery, tender crumb into a breakfast staple that feels both indulgent and approachable. By following the step‑by‑step guide, using cold ingredients, and respecting the gentle mixing technique, you’ll achieve a bakery‑quality result every time. Feel free to experiment with cheese varieties, herbs, or add‑ins—making the recipe your own is part of the fun. Serve warm, share generously, and enjoy the comforting aroma that signals a perfect brunch is on its way.